How to Create a 2-way Communication Smart Contract With Solidity and Axelar
In this tutorial, you will learn how to build a 2-way cross-chain communication smart contract with Solidity and Axelar General Message Passing (GMP)
Software Engineer | Developer Advocate | Technical Writer | Content Creator
Sending messages with Axelar General Message Passing (GMP) is a fantastic way to build cross-chain decentralized applications. But what if you want to perform an on-chain query or enable two-way communication by sending and replying to messages? It's easy!
In this tutorial, you will learn how to build a two-way cross-chain communication smart contract with Solidity and Axelar General Message Passing (GMP)
The complete code for this tutorial is available on GitHub for a quick start. A basic understanding of Solidity is required to follow along.
Building a 2-way cross-chain communication smart contract
Building a two-way cross-chain communication smart contract using Axelar GMP is a simple process. To get started, refer to this code available on GitHub gist.
You can use https://remix.ethereum.org/, a powerful toolset for developing, deploying, debugging and testing Ethereum and EVM-compatible smart contracts. Create a new file titled SendMessage.sol inside the contracts folder and copy the code from this gist into it. This will get you started with the process.
// SPDX-License-Identifier: MIT
pragma solidity ^0.8.0;
import { AxelarExecutable } from '@axelar-network/axelar-gmp-sdk-solidity/contracts/executable/AxelarExecutable.sol';
import { IAxelarGateway } from '@axelar-network/axelar-gmp-sdk-solidity/contracts/interfaces/IAxelarGateway.sol';
import { IAxelarGasService } from '@axelar-network/axelar-gmp-sdk-solidity/contracts/interfaces/IAxelarGasService.sol';
import { IERC20 } from '@axelar-network/axelar-gmp-sdk-solidity/contracts/interfaces/IERC20.sol';
contract ExecutableSample is AxelarExecutable {
string public message;
IAxelarGasService public immutable gasService;
constructor(address gateway_, address gasReceiver_) AxelarExecutable(gateway_) {
gasService = IAxelarGasService(gasReceiver_);
}
// Call this function to update the value of this contract along with all its siblings'.
function sendMessage(
string calldata destinationChain,
string calldata destinationAddress,
string calldata value_
) external payable {
require(msg.value > 0, 'Gas payment is required');
bytes memory payload = abi.encode(value_);
gasService.payNativeGasForContractCall{ value: msg.value }(
address(this),
destinationChain,
destinationAddress,
payload,
msg.sender
);
gateway.callContract(destinationChain, destinationAddress, payload);
}
// Handles calls created by setAndSend. Updates this contract's value
function _execute(
string calldata sourceChain_,
string calldata sourceAddress_,
bytes calldata payload_
) internal override {
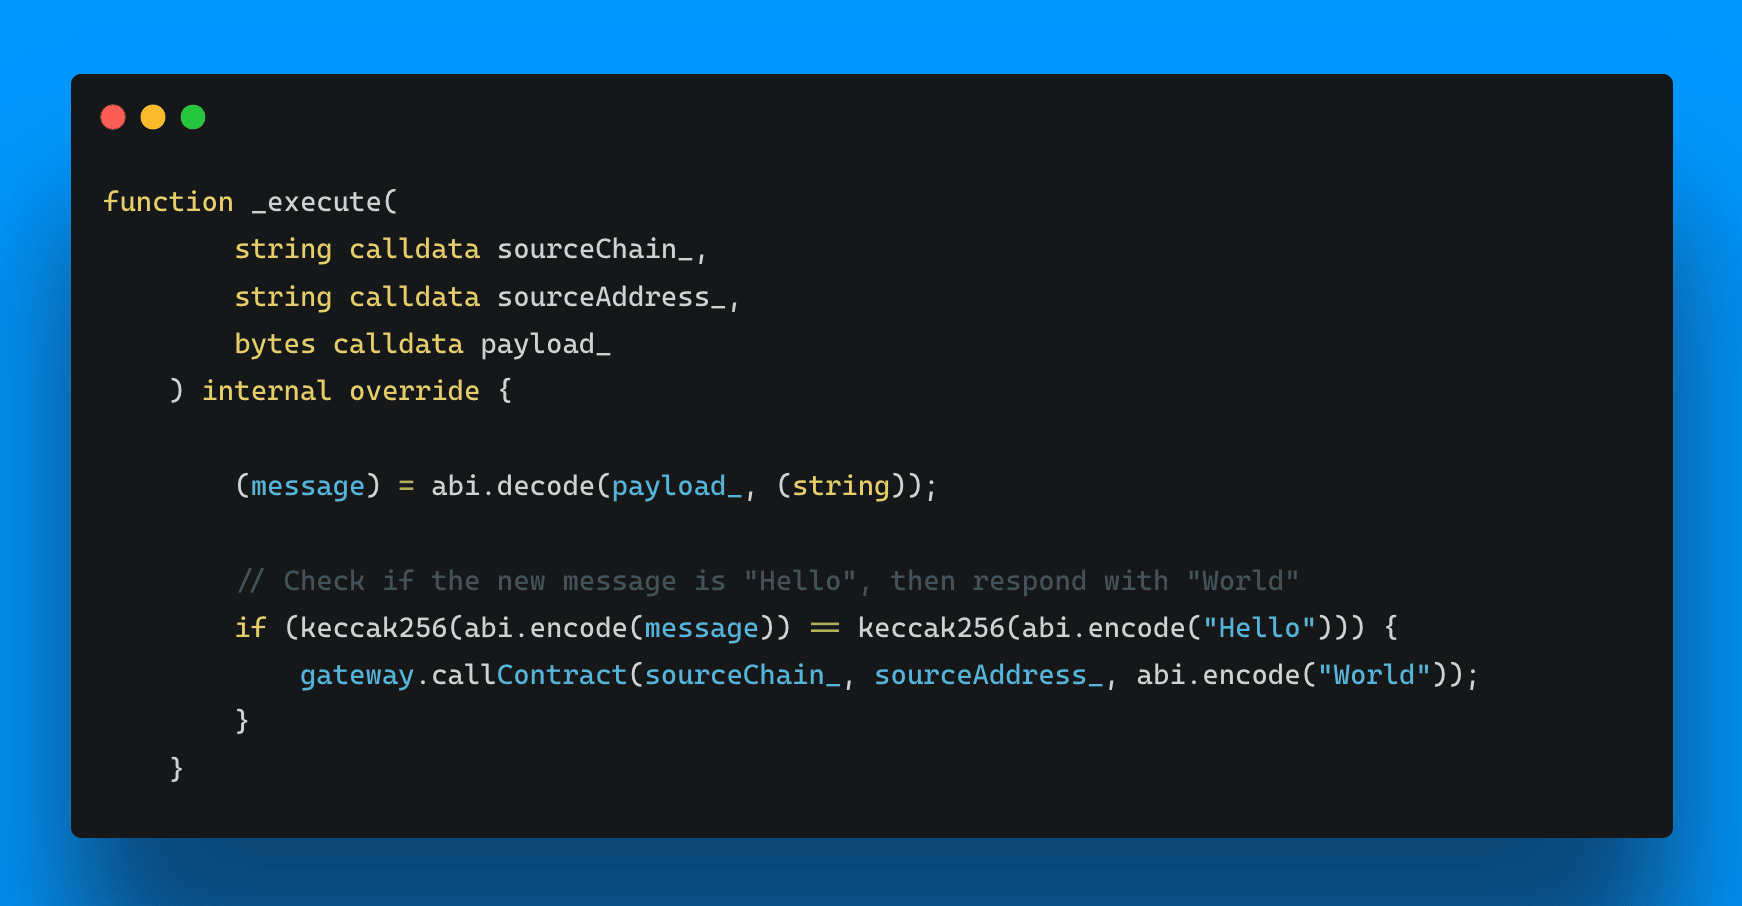
// Decode the payload to retrieve the new message value
(message) = abi.decode(payload_, (string));
// Check if the new message is "Hello", then respond with "World"
if (keccak256(abi.encode(message)) == keccak256(abi.encode("Hello"))) {
gateway.callContract(sourceChain_, sourceAddress_, abi.encode("World"));
}
}
}
The code snippet above is what you have in the GitHub gist, and it's similar to the one used to send messages cross-chain. What changed?
The _execute method is called whenever a message is received from Axelar GMP. By initiating a new message with a call to callContract from within _execute, the Axelar network recognizes this as a two-way call and will use the gas from the initial transaction to pay for the return message.
In this example, if the new message is Hello, it responds by calling the gateway to send a World message back to the source chain.
Next, you can proceed to compile the smart contract. Click the compile icon and then the compile buttons are shown below.

Deploying the 2-way cross-chain communication smart contract to Polygon and Avalanche networks
Deploying the smart contract to Polygon and Avalanche testnets requires specifying both the Axelar Gateway Service and the Gas Service contract in the argument. This section will guide you through the deployment process.
You can find the list of Axelar Gas Service and Gateway contracts for all the chains currently supported by Axelar here.
You also need a faucet for your Polygon and Avalanche testnet accounts to ensure successful contract deployment. To get the Polygon faucet, visit this link and for the Avalanche faucet, access it here.
Deploy to Polygon testnet
Click the deploy icon on Remix, as shown below.

Select the deployment target, Injected Provider - MetaMask.

Add the Axelar Gateway Service: 0xBF62ef1486468a6bd26Dd669C06db43dEd5B849B and the Gas Service: 0xbE406F0189A0B4cf3A05C286473D23791Dd44Cc6 contract address deployed on Polygon.
To find the contract addresses for EVM chains, go to the References section on the Axelar documentation website. Copy the gateway and gas service contract addresses specifically for Polygon, as shown below.

Next, click the transact button.

Copy the contract address and save it somewhere; you will need it later in this tutorial.

Contract address: 0x9D6C0Fe031DC374474a85557B2b8545067a0F979.
Deploy to Avalanche Fuji testnet
Now you’ve deployed the smart contract to Polygon. Next you will switch chains and deploy to another chain so that you can send messages between the blockchains.
Copy the Axelar Gateway Service and Gas Service for Avalanche.

Add the Axelar Gateway Service contract address:0xBF62ef1486468a6bd26Dd669C06db43dEd5B849B and the Gas Service contract address: 0xbE406F0189A0B4cf3A05C286473D23791Dd44Cc6 . Following the same steps above to deploy the contract.

Contract successfully deployed on Avalanche Fuji testnet.

Contract address: 0x6E0C5A63b96c9241D28A5650eeb6e5aea5322745.
Congratulations! You have successfully deployed to both the Polygon and Avalanche Fuji testnets. Next, you can send a message to witness the two-way cross-chain communication and experience the magic of Axelar.
Sending a 2-way cross-chain message from the smart contract
To achieve a two-way call between Avalanche and Polygon testnets, send a Hello message from Avalanche and expect a World message in response back to the source chain. This is specified in the _execute method of the smart contract you previously wrote.
Add the following details as a parameter to the sendMessage function:
// Gas value to pay for the entire transaction in Ether
value: 2

currency: ether

// The destination chain
destinationChain: Polygon

// The contract address you deployed to Polygon
destinationAddress: <YOUR DEPLOYED POLYGON CONTRACT ADDRESS>

// The message you want to send
value_: Hello
You need to ensure you have enough testnet gas tokens to pay for this transaction to go through. if you don't, access the Polygon faucet via this link; and for the Avalanche faucet, access it here.

Click on the transact button to send the message.

Verifying the 2-way cross-chain communication call on Axelarscan testnet
To ensure that everything went according to plan with your two-way cross-chain communication, you can follow the progress of your messages on Axelarscan testnet. Visit https://testnet.axelarscan.io/ and enter the transaction hash you received when you sent the message from Avalanche Fuji to Polygon testnet.
You can confirm it was successful after 1 minute, 25sec. Reading the stored message on the source chain, it should now say World.
Transaction hash: 0x2885b00339eb01bb3c2b4a544bb77988c721d8f89087cf35d8818f5da8c97b44

It's important to note the Callback button as shown in the image above, which indicates this transaction was a two-way call. You can click to verify if the callback happened from Polygon back to Avalanche Fuji testnet.
Once you click it you will be taken to https://testnet.axelarscan.io/gmp/0xe6f546fac29eb18f5f899bc8f7acf20c0c1652069e7c1d16cd04e257b9aa9481:61, where you can view the details confirming that there has been a response from the Avalanche Fuji testnet.

That's not all; go back to Remix, where you have your smart contract. If you click the message button as shown below, you will be able to retrieve World from Avalanche and Hello from Polygon, respectively.

Switch your network to the Polygon testnet on MetaMask and click the message button to retrieve the message sent from the Avalanche Fuji testnet.

Congratulations! 🥳 You have successfully built and deployed a two-way communication smart contract using Solidity and Axelar.
What next?
This post covered the utilization of Axelar's General Message Passing with callContract, but that's not all General Message Passing can do.
You can always explore other functionalities like callContractWithToken, SendToken, Deposit addresses, NFT Linker, JavaScript SDK, etc.
Take a look at the Axelar examples repository, which includes code for several example decentralized applications (dApps) in the Axelar Local Development Environment. The examples consist of both JavaScript and Solidity smart contract code.
If you've made it this far, you're incredible! You can post about your experience building or following along with this tutorial to show your support to the author and tag @axelarnetwork on Twitter.
Conclusion
This tutorial covered how to build a two-way cross-chain communication smart contract using Solidity and Axelar GMP.
By leveraging Axelar GMP, developers can call any function on interconnected chains seamlessly, enabling them to perform cross-chain transactions.